Mar, 18, 2026
Content
An LED module is a self-contained, pre-assembled light-emitting unit built around one or more LED chips mounted on a substrate or printed circuit board (PCB), combined with the electrical components needed to operate them. Unlike a bare LED chip or a finished lamp, an LED module serves as the core light-emitting component that can be integrated into a wide range of lighting fixtures — including street lights, courtyard lights, wall lights, advertising light boxes, and decorative lighting products — either during original assembly or as a replacement part during maintenance.
Every LED module, regardless of shape or application, consists of several fundamental components working together to produce stable, efficient light output.
LED modules are manufactured in a wide variety of formats to suit different fixture types, installation methods, and lighting requirements. The most common types include:
| Module Type | Construction | Typical Application |
|---|---|---|
| SMD Module | Surface-mount LEDs on aluminum PCB | Street lights, downlights, panel lights |
| COB Module | Multiple chips bonded directly to substrate | Spotlights, high-bay lights, floodlights |
| Flex Strip Module | SMD LEDs on flexible PCB tape | Decorative lighting, signage, cove lighting |
| Plug-in Module | Standardized connector for tool-free swap | Courtyard lights, wall lights, replaceable fixtures |
| Advertising Light Box Module | Linear or grid array, uniform illumination | Backlit signage, display panels, retail lighting |
When evaluating an LED module, several technical specifications directly determine its suitability for a given application and its long-term performance reliability.
The modular design philosophy behind LED modules solves several practical problems that arise when using integrated LED lamps in commercial and industrial lighting.
Because the LED module is a separate, replaceable component within a fixture, only the module needs to be replaced when light output degrades — not the entire luminaire body, housing, or optical system. This dramatically reduces maintenance costs and material waste over the lifetime of a lighting installation. A street light with a replaceable LED module, for example, can be upgraded to a higher-efficacy module as technology improves, without replacing the pole, driver enclosure, or wiring infrastructure.
Standardized module sizes and connector types also enable mass assembly efficiency for lighting manufacturers, allowing the same module to be incorporated into multiple fixture designs and simplifying inventory management for both manufacturers and maintenance teams.
The primary function of an LED module is to serve as the core light-emitting component within a lighting fixture, converting electrical energy into visible light with high efficiency, consistent color output, and long operational life. Beyond basic illumination, LED modules perform several additional functions — managing heat, shaping light distribution, enabling easy maintenance, and providing the electrical interface between the power driver and the light-emitting elements — that collectively determine the performance quality of the entire luminaire.
At its core, an LED module converts electrical current into light through electroluminescence — a process in which electrons passing through a semiconductor material release energy in the form of photons. This process is significantly more efficient than incandescent or fluorescent light generation, with modern LED modules achieving luminous efficacy of 100–200 lumens per watt compared to 10–15 lm/W for incandescent bulbs and 60–100 lm/W for fluorescent tubes.
High-quality LED modules are specifically engineered to maintain this efficiency across long operational periods with minimal lumen depreciation — meaning the light output remains close to its original level for tens of thousands of hours rather than degrading rapidly as older light source technologies do.
An LED module does more than emit light — it shapes and directs that light to where it is needed. The optical components integrated into or mounted onto the module determine how the emitted light is distributed across the target surface.
Heat management is one of the most critical functions of an LED module's design. While LEDs generate far less heat than incandescent sources, the heat they do produce is concentrated at the LED junction — the semiconductor interface — and must be efficiently conducted away to prevent premature degradation.
The aluminum PCB substrate used in most quality LED modules provides a direct thermal conduction path from the LED junction to the fixture's heat sink. This function is essential: every 10°C reduction in junction temperature can approximately double LED lifespan. Modules with excellent heat dissipation performance maintain junction temperatures well within safe operating limits, directly translating to longer service life and sustained lumen output.
LED modules function as the electrical interface between the fixture's power driver and the light-emitting elements. This interface role includes several important sub-functions:
One of the most practically important functions of a modular LED design is enabling targeted maintenance. When a fixture's light output decreases below acceptable levels, only the LED module needs to be replaced — the fixture housing, optical cover, wiring, and mounting hardware all remain in service.
This function is particularly valuable in large-scale installations such as street lighting networks, commercial parking facilities, or industrial sites, where replacing entire fixture assemblies would involve significant labor costs and material waste. A maintenance team equipped with compatible replacement modules can restore full illumination performance in minutes per fixture, compared to hours for full fixture replacement.
LED modules also function as a customizable lighting platform. Unlike fixed-specification lamps, modules can be produced or specified with tailored parameters to meet the exact requirements of a given application:
Yes — LED modules are designed to be replaced, and this replaceability is one of their core advantages over integrated LED lamps. In most street lights, courtyard lights, wall lights, advertising light boxes, and commercial fixtures, the LED module is a discrete, separable component that can be disconnected and swapped out when light output degrades — without replacing the fixture housing, driver, or mounting hardware. Whether a module can be replaced in a specific fixture depends on the fixture's design, but the majority of commercial and outdoor luminaires are built with module replacement explicitly in mind.
Even high-quality LED modules with rated lifespans of 50,000 hours or more will eventually experience lumen depreciation — a gradual reduction in light output as the LED chips age. The industry standard L70 rating defines the point at which output drops to 70% of the original level. At typical commercial usage of 4,000 hours per year, an L70 of 50,000 hours represents approximately 12.5 years before a module reaches this threshold.
When that point is reached, replacing only the LED module rather than the entire fixture delivers significant cost and sustainability advantages. The fixture housing, reflector, driver enclosure, and installation infrastructure all remain in service — only the light-emitting component is renewed.
Not all LED modules are equally easy to replace. The ease of replacement depends primarily on how the module is connected to and secured within the fixture.
| Module Type | Connection Method | Replacement Ease | Tools Required |
|---|---|---|---|
| Plug-in module | Standardized push-fit connector | Very easy | None (tool-free) |
| Screw-mounted SMD module | Screws + wire connectors | Easy | Screwdriver |
| COB module (socketed) | Dedicated socket or clip | Moderate | Minimal tools |
| Soldered / integrated module | Direct solder to fixture PCB | Difficult | Soldering equipment |
Before attempting to replace an LED module, confirm the fixture's design supports it. The following steps help determine replaceability quickly.
For fixtures with accessible, plug-in or screw-mounted modules, replacement is a straightforward process that most maintenance personnel can complete without specialist electrical training.
The economic case for modular LED design becomes clear when comparing the costs of module replacement against full fixture replacement over the service life of a lighting installation.
LED modules are applied across virtually every category of modern lighting — from outdoor infrastructure and commercial signage to architectural decoration and industrial facilities. Their versatility in voltage, size, beam angle, and color specification makes them the preferred light source for fixture manufacturers, lighting designers, and maintenance engineers working across residential, commercial, municipal, and industrial environments.
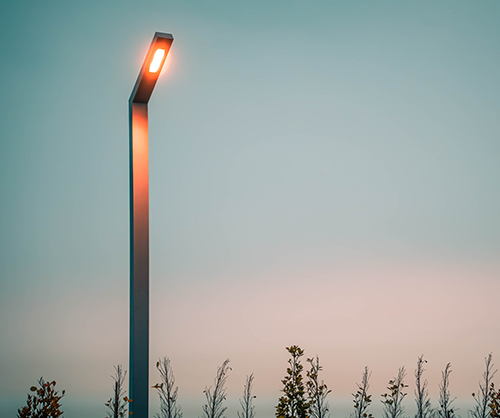
Street lighting is one of the largest and most impactful applications for LED modules globally. High-power SMD and COB LED modules have replaced high-pressure sodium and metal halide lamps in municipal road lighting, delivering dramatic improvements in both energy efficiency and light quality.
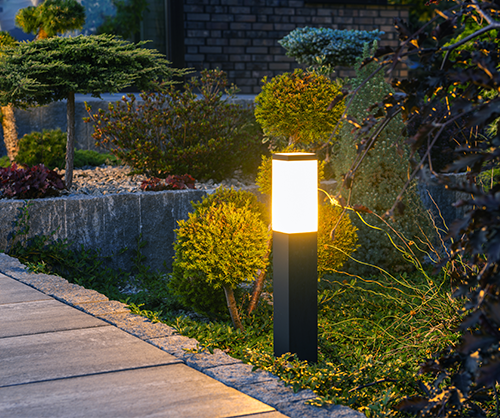
Courtyard lights, garden path lights, and landscape bollards use LED modules to provide ambient and accent illumination in residential communities, parks, hotel grounds, and public plazas. These applications demand long operational life, weather resistance, and attractive light color.
LED modules used in courtyard lighting are typically rated at 10W to 50W with warm white (2700–3000K) output to create a welcoming, comfortable nighttime environment. The modular design means that when a module eventually requires replacement after years of outdoor service, the decorative fixture body does not need to be disturbed.
LED modules — particularly slim linear and grid-array formats — have become the standard backlighting solution for advertising light boxes, retail display panels, menu boards, and illuminated signage. Their ability to produce uniform, consistent illumination across large flat surfaces makes them ideal for applications where color accuracy and even brightness are essential to image quality.
Wall-mounted luminaires for building exteriors, stairwells, corridors, and architectural feature lighting use LED modules to combine energy efficiency with design flexibility. The compact form factor of LED modules allows fixture designers to create slim, low-profile wall light housings that would not be possible with bulb-based light sources.
For facade lighting applications, RGB and tunable white LED modules enable dynamic color-changing effects and programmable illumination sequences used in architectural feature lighting, bridge illumination, and landmark buildings.
Warehouses, manufacturing facilities, logistics centers, and sports arenas require high-intensity lighting at mounting heights of 6 to 20 meters or more. High-power COB and multi-chip SMD LED modules rated at 100W to 400W are used in high-bay and low-bay luminaires to replace metal halide and high-pressure sodium lamps in these demanding environments.
Beyond functional lighting, LED modules are used extensively in decorative and specialty lighting applications where aesthetic effect, color flexibility, and compact form factor are the primary requirements.
Using an LED module correctly involves matching it to a compatible power driver, mounting it with proper thermal contact, making secure electrical connections, and verifying performance before closing the fixture. Whether you are assembling a new luminaire, replacing a degraded module in an existing fixture, or integrating modules into a custom lighting product, the process follows the same core principles: correct power matching, secure mechanical mounting, good thermal management, and safe wiring.
An LED module cannot be connected directly to mains AC power. It requires a constant-current LED driver that converts the AC supply to a regulated DC output matched to the module's electrical specifications. Selecting the wrong driver is the most common cause of premature LED module failure.
LED modules must be mounted on a thermally conductive surface — typically an aluminum heat sink — to conduct operating heat away from the LED junction. Poor thermal contact is a leading cause of shortened LED module lifespan.
Once the module is mechanically secured, connect it to the LED driver output. Always ensure power is off before making or modifying wiring connections.
After securing the module and completing wiring, install any secondary optics — lenses, reflectors, or diffusers — that shape the final light distribution of the luminaire.
With installation complete, restore power and verify that the module operates correctly before finalizing installation.
Most premature LED module failures in practice result from a small number of avoidable installation and usage errors. Being aware of these protects both the module and the driver investment.
The key difference is that an LED light is a complete, ready-to-use lighting product — including the housing, optics, driver, and light source — while an LED module is only the light-emitting component designed to be installed inside a fixture. An LED light is what you install in a room or on a street pole; an LED module is what a manufacturer puts inside that light, or what a maintenance engineer replaces when the light source degrades. Understanding this distinction is essential for anyone purchasing, specifying, or maintaining lighting systems.
| Component | LED Light (Complete Fixture) | LED Module (Component Only) |
|---|---|---|
| LED chips / light source | Included | Core component |
| Power driver / ballast | Included (built-in) | Not included — requires external driver |
| Fixture housing / body | Included | Not included |
| Optical lens / reflector | Included | Sometimes included (primary lens only) |
| Heat sink | Included | Requires external heat sink in fixture |
| Mains power connection | Direct AC connection | Low-voltage DC input only |
| Ready to install and use | Yes | Must be integrated into a fixture |
The distinction between LED lights and LED modules also maps to different user groups with different needs.
A complete LED light — whether a street light, floodlight, panel light, or LED bulb — is purchased and installed by the end user or electrical contractor. It connects directly to the electrical supply and is ready to function immediately. The buyer does not need to understand or configure the internal components; they simply select the product based on wattage, beam angle, color temperature, and form factor requirements.
LED modules are primarily used by lighting manufacturers assembling luminaires, OEM product designers integrating light sources into equipment, and maintenance professionals replacing degraded light sources within existing fixture installations. Working with LED modules requires knowledge of driver specifications, thermal management, and electrical connection requirements.
One of the most practically important differences between LED lights and LED modules relates to how each is maintained when light output degrades over time.
In an integrated LED light where the module is permanently bonded to the fixture, the entire product must be replaced when the LEDs degrade — including the housing, driver, and all other components that may still be in good working order. This creates unnecessary waste and cost.
In a modular LED fixture where the LED module is a replaceable component, only the module is swapped at end of life. The fixture housing, heat sink, driver, and mounting infrastructure all remain in service. This approach typically reduces maintenance cost per light point by 40–60% compared to full fixture replacement, and is the preferred design approach for commercial, municipal, and industrial lighting installations where long-term maintenance cost matters.
Standard LED lights are produced in fixed specifications — a specific wattage, color temperature, beam angle, and form factor. While a wide range of products exists, the end user must select from available options.
LED modules, by contrast, can be specified or customized to precise parameters including beam angle, light color, wattage, size, and connector type. This makes them the preferred choice for lighting manufacturers and OEM designers who need a light source that exactly matches their product's requirements rather than adapting their design around a pre-made lamp format. Select module suppliers offer customization services that allow parameters to be adjusted according to specific production requirements.
LED modules are priced as components rather than finished products. A module representing the light-emitting portion of a street light, for example, will typically cost 20–40% of the price of the complete street light fixture — reflecting the cost of the LED chips, PCB, and optics without the housing, driver, heat sink, or assembly labor that make up the rest of the fixture's cost.
Related Products
 Private Industrial Park, Liangnong Town, Yuyao City, Ningbo City, Zhejiang Province, China
 +86-13486062091
 +86-574-2222 2345
 +86-574-2267 2345
 info@ym-lighting.com


 English
 中文简体
中文简体 русский
 Français
 বাংলা
বাংলা 한국어
한국어 日本語
日本語 Latine
 ไทย
ไทย عربى
عربى Hrvatski
 čeština
 dansk
dansk Nederlands
 Pilipino
 Deutsch
 Suomalainen
 Magyar
 Indonesia
 italiano
 فارسی
فارسی Gaeilge
 Bahasa Melayu
 norsk
norsk Português
 Polskie
 Español
 Română
 Slovák
 svenska
 Türk
Türk